Monthly Archives: February 2011

Steak Fajitas and Fresh Guacamole

We seriously LOVE this meal. It is so delicious, I think we’ve made it at least three times since we moved here (and I pretty much never repeat meals). I got the recipe from Tyler Florence, who has some seriously fabulous recipes. I feel like I might need to invest in one of his cookbooks… Anyhow, I think the two things that really put this dish over the top are the marinade and the homemade guacamole.

Oh man. I ate so much.

(recipes from the food network)

Mojo (marinade):

  • 1 orange, juiced
  • 2 limes, juiced
  • 4 tablespoons olive oil
  • 2 garlic cloves, roughly chopped
  • 3 chipolte chiles, in adobo sauce (they come in a small can)
  • 3 tablespoon roughly chopped fresh cilantro leaves
  • 1 teaspoon ground cumin
  • 1 teaspoon salt

-Put all the ingredients for the marinade into a blender and blend until smooth.

Fajitas:

  • 2 pounds skirt steak
  • 1 large thinly sliced onion
  • 1 red bell pepper and 1 yellow bell pepper, both thinly sliced

-Cut steak into thick slabs. Place into a large ziploc bag with the mojo. Place bag in the refrigerator and allow meat to marinate for 2-4 hours.

-Heat a lightly greased grill pan over high heat. Add the steaks to the pan when it’s hot.

-Cook for about 5 minutes on each side.

-Remove to a cutting board to let the meat rest.

-Toss the onions and bell peppers with a little olive oil, lime juice, salt, and pepper and add them to the pan you cooked the steak in (still on high heat).

-Grill the vegetables for about 10 minutes, until they are brown and tender.

-Slice the steak diagonally against the grain.

-Serve with warm tortillas, grilled peppers and onions, homemade guacamole, and other desired toppings.

Fresh Guacamole

  • 3 ripe Hass avocados
  • 1-2 limes, juiced
  • 1/4 small onion, chopped
  • 1 small garlic clove, minced
  • 1/4 c. fresh cilantro leaves, roughly chopped
  • Kosher salt and freshly ground black pepper
  • Drizzle olive oil

-Remove the avocados from their peels with a spoon.

-Mash the avocado with a fork, leaving large chunks.

-Add the rest of the ingredients and fold together to combine.

-Refrigerate for an hour before serving (cover it with saran wrap directly on the surface of the guac to keep it from turning brown).

We seriously enjoyed the spread. And we ate way too much. Perfect evening.

(Eeehhh yeah, a blurry picture happens every once in a while. Oh well.)

I have to go do all my homework for tomorrow and try to do more summer job searching… I hope your evening is more fun that mine! 🙂 Thanks for reading!

5 Comments

Filed under Uncategorized

A Soul Food Sunday: Fried Chicken, Candied Yams, Smoky Mac n Cheese, and Collard Greens

I love the idea of Sunday dinner. In my family, it usually meant going out to a restaurant we enjoyed after church in the early afternoon, sometimes with other families from church. For my husband’s family it meant a big meal at the family table in the early afternoon. When I can, I try to make a special early dinner for us on Sundays. It just starts the week off right! Today I made a classic Southern meal, and I tried to make adjustments from the recipes I usually use to make it healthier and less fatty.

WELL worth spending half a day on.

(Sorry there are no step-by-step pictures in this post. My camera died on me and only started working again once I was done with everything! Annoying. )

Collard Greens

While my mom makes greens all the time, this is the first time I made them from scratch (I usually just heat up some canned ones). It takes forever to make, but oh man are the results worth it. I used smokey turkey rather than the traditional hamhock for the flavor to cut down on fat.

  • 2 lb. bag of pre-washed and cut collard greens
  • 1 smoked turkey wing
  • 3 quarts water
  • 2-3 T. salt (it gets diluted in the liquid)
  • 1 T. canola oil
  • hot sauce

-Start by boiling the water in a LARGE pot over medium-high heat. When the water comes to a rolling boil add the turkey wing. Cover and let boil for an hour (the meat will get very tender and start to fall off the bone).

-Add salt, oil, and a few dashes of hot sauce to the pot and stir to combine. Add the collard greens to the water one handful at a time, waiting for the leaves to shrink when they are submerged.

-Allow the pot to return to a boil, then lower the heat as low as it will go and let the greens simmer for at least one hour (I cooked mine for 2).

-Remove the greens from the pot with a slotted spoon and serve. Serves 4.

Smoky Mac n Cheese (inspired by recipe from Southern Living Magazine, January 2011 issue)

  • 1/2 lb. corkscrew pasta
  • 1 T. butter
  • 2 T. all-purpose flour
  • 1 1/2 c. 2% milk
  • 1/2 can fat-free evaporated milk
  • 1/2 c. smoked Gouda cheese
  • 1/2 c. sharp cheddar cheese (made from 2% milk)
  • 1/2 t. salt
  • 1/2 t. pepepr

-Cook the pasta until al dente, according to package directions.

-Meanwhile, grate the Gouda and cheddar cheeses.

-In a small saucepan, melt the butter over medium heat and then add in the flour, whisking together quickly for 1 minute. Gradually add both types of milk, whisking together until smooth. Continue to whisk and cook over medium heat for about 10 minutes, or until the sauce is thick.

-Add the Gouda and half of the cheddar to the pot and whisk until melted and smooth. Add salt and pepper and remove from heat.

-In a large bowl, combine the cooked pasta and the sauce, and then pour into a pre-greased baking dish.

-Top with the rest of the shredded cheddar cheese at bake in a 350 degree oven for about 30 minutes.

-Remove from the oven and let cool about 5 minutes before serving. Serves 4.

I really loved the Gouda in this and think it’s a great idea, but this actual recipe I wasn’t crazy about. It’s pretty low in fat and calories, but that means nothing to me if it doesn’t taste great. It ain’t got nothin’ on Patti LaBelle’s Over the Rainbow Mac n Cheese (a whopping 798 calories and 49.3 grams of fat per serving) that I usually make. I’m going to keep working on a healthier version of that recipe.

Candied Yams

  • 2 large sweet potatoes
  • 1 T. molasses
  • 2 T. coconut oil
  • 1/4 c. organic sugar
  • 1 t. cinnamon
  • 1/4 t. nutmeg

-Peel and cut sweet potatoes into large chunks. Place the chunks into a baking dish.

-In a small saucepan, heat the rest of the ingredients over medium heat. Whisk as it cooks, until it forms a thick syrup.

-Top the sweet potatoes with the syrup. Sprinkle with the cinnamon and nutmeg and stir to coat the potatoes.

-Bake in a 350 degree oven for 45 minutes, or until the potatoes are tender and brown. Serves 4.

So delicious. The coconut oil actually made a GREAT substitute for the half stick of butter I would have normally used.

And last but certainly not least…

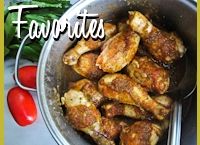
Southern Fried Chicken

  • 8 chicken pieces
  • 1 T. salt
  • 2 cups all-purpose flour
  • 1 T. salt
  • 1 t. black pepper
  • canola oil for frying

-Heat the oil (enough to fill up the pan 3-4 inches high) in your frying pan. While you wait for the oil to heat, fill a large bowl with ice water and stir in the salt. Let the chicken pieces soak in the water until the oil is hot (about 10 minutes).

-Add the salt and pepper to the all-purpose flour inside of a gallon ziploc bag. Zip the bag and shake it around to combine.

-Two pieces at a time, remove the chicken from the ice bath and put them into the ziploc. Zip the bag and shake it around until the chicken pieces are completely covered in flour. Open the bag and shake off any excess flour before putting the chicken into the hot oil.

-Fry the chicken for about 25 minutes. Fry it in batches, and be careful not to crowd the pot (for example, I fried my 8 pieces of chicken in 3 separate batches).

-When the pieces are done, remove them to a towel-lined plate and allow to cool 5 minutes before serving.

Nothing makes me happy quite like the sight of freshly fried chicken. There’s no need to feel that guilty about it either because it’s not that unhealthy, especially when eaten in moderation. I don’t use hydrogenated oils to fry with, so there is no trans fat here (whereas you might get it if you order fried chicken at a fast food joint)!

Now THIS is my kind of meal.

After eating this we can die happy.

Weeeelllll, now I have to go do that homework I’ve been avoiding all weekend…/watch the Oscars…

Thanks so much for reading!

7 Comments

Filed under Uncategorized

An Afternoon Pick-me-up: Nutty Nutella Latte

A lot of times you just need that little something extra in the afternoon, and when that time rolls around I frequently have Starbucks on my mind. But let’s face it, a ‘bucks habit isn’t exactly the best thing for a law student budget. Let me re-phrase that, it’s a horrible thing for a law student budget. I usually just pine away for it and go unsatisfied, but today I bought a new brand of almond milk and I decided I would try to make one of my favorite Starbucks drinks, but KICKED UP A NOTCH!

P.S.- I recently discovered that I am lactose intolerant, which is why you keep seeing almond milk in my recipes. Obviously cow’s milk would work just fine as a replacement, and soy milk would be great too.

P.P.S- Yes I just said I’m lactose intolerant and yet there is a mound of heavy whipping cream on top of my beverage. I guess you could say that I’m not quite ready to say goodbye?

Nutella is great for hot drinks, and you can use it to make a mocha latte without all that chocolate flavored syrupy stuff.  I adore Nutella. As you can see.

Anyways, enough yapping, on to the good stuff.

Nutty Nutella Latte

  • 2 cups vanilla almond milk
  • 1 cup strong black coffee
  • 1 T. nutella
  • 1 t. vanilla extract

-Put the almond milk in a small saucepan and heat until simmering. Add the black coffee and whisk together over low heat.

-Add a heaping tablespoon of Nutella to the saucepan. (Or just do what I did and scrape out whatever is left in the container…)

-Whisk it together until the Nutella is melted into the liquid.

-Remove the saucepan from the heat and whisk in the vanilla extract. Pour into a couple mugs and top with whatever garnish you fancy! Sit back and watch your afternoon be suddenly improved.

I’m off to make Pioneer Woman’s Penne a la Betsy, one of my favorite dinner recipes ever. Thank heavens it’s the weekend. Thanks for reading!

2 Comments

Filed under Uncategorized

The Green Drink Slowly Changing My Life

Does this look yummy? Not really. Would my seven-year-old sister go near it with a ten foot pole? Nope. Is it delicious? YES. Is it amazing for your body??? YES!!!!

Before you dismiss this as something you would never eat (for those of you non-food blogging peeps out there), you gotta hear me out. This drink, called a Green Monster, is (first and foremost) DELICIOUS! I’m not kidding!!!! It tastes like an amazing, creamy, decadent, sweet treat. If you drank it blindfolded you would have NO idea that it was green.

So why is it green? It has vegetables!!! And if you’re like me and struggle with veggie intake, the best part about this is that you CAN NOT TASTE THE VEGETABLES. I SWEAR!

I use the simple recipe that the Oh She Glows blogger calls the “Classic” Green Monster:

  • 1 cup almond milk (or whatever milk you want)
  • 1 ripe banana
  • 2 big handfuls of spinach
  • 1 T. peanut butter
  • 1 T. flax seeds

All you do is mix it together in a blender until it’s totally smooth and blend in a couple cubes of ice if you like. Instant breakfast and wonderful nutritional boost!!!

If you have a blender, you must try this. For your own sake. I forced Jason to drink some (key word being forced) and even he could not look me in the eye and tell me that it wasn’t delicious.

This drink gives me so much energy and I LOVE starting the day knowing that I’ve already got some vegetables in without even trying. And I have no doubt that I will see long-term results in my health. Stay tuned!

Oh Green Monster…how have I lived so long without you?!


11 Comments

Filed under Uncategorized

Whole Wheat Makeover #4: Fluffy White Wheat Rolls

Last week I ran out of time for cooking several times because of all the crazy things going on in life (middle of the semester, applying for summer clerkships, etc.) so now I realize that when I have ANY available time I need to be making sure we got some food around this here house! Rolls are great because they last for several days and you can even make a big recipe and freeze them for later. Plus they go with almost any meal. This is another family recipe, just adjusted to be whole wheat (I added wheat gluten and a little more liquid to keep it soft and fluffy).

Fluffy White Wheat Rolls

  • 1 package active dry yeast
  • 1 c. warm water
  • 1 egg
  • 1/4 c. oil, plus 1 T.
  • 1/4 c. sugar
  • 1 1/2 t. salt
  • 3 cups 100% white whole wheat flour
  • 1/4 c. vital wheat gluten flour
  • 1/4 c. warm milk

-Dissolve the yeast, water, and 1 t. of the sugar. Let stand for 10 minutes to proof, until the yeast is foamy.

-Whish the egg, oil, salt, and the rest of the sugar into the yeast. The liquid should be frothy.

-Put the flour and wheat gluten into a mixer or food processor fitted with a dough blade.

-Add the liquid and mix until the dough starts to form. Slowly add in the warm milk and mix until the dough forms into a soft and stretchy ball. Remove the ball to a large bowl and coat with the 1 T. of oil.

-Cover with a damp towel and let rise in a warm place until it doubles in size like this:

-Punch down the dough and knead it gently until the dough is very soft and elastic. Divide and form into about 10 rolls (I can only fit 7 into my pan). Place the rolls into a greased pan, leaving a lot of room in between the rolls for them to rise.

-Cover with a damp towel and let rise for another hour, until the rolls about double in bulk like this:

-Heat the oven to 350 degrees and bake the rolls for 20 minutes, or until they are golden brown. Brush with 1 T. melted butter.

-Let cool a few minutes and serve warm!

Delicious! It doesn’t get much better. My mom used to call the “the roll queen” when I was little because I would eat so many any time she made them.

And while the dough was rising I had time to make this SCRUMPTIOUS Rustic Chocolate Chip Banana Oat Cake with PB Glaze from Angela Liddon’s blog Oh She Glows. I made it as soon as she posted it (a couple weeks ago) and it was sooo good that I had to make it again. Healthy, hearty, and satisfying. She is so talented.

Thanks for reading!!!

5 Comments

Filed under Uncategorized

I Know About Second Breakfast: Bacon, Cheddar, and Spinach Frittata

“What about breakfast?”

“You’ve already had it.”

“We’ve had one, yes. What about second breakfast?”

I wholeheartedly agree with the idea of second breakfast, and not just because the greatest author who ever lived is the one who gave me the idea. To me breakfast is sunshine, comfort, rejuvenation, and bacon. Why not enjoy it twice? And while I didn’t eat elevenses today (you really get points if you get that reference), we did decide to have second breakfast instead of lunch. Greatest idea ever.

Bacon, Cheddar, and Spinach Frittata

  • 1/4 c. onions (or half onions and half green peppers if you’re feeling feisty)
  • 2 slices thick-cut bacon
  • 2 handfuls of fresh spinach
  • 4 organic eggs
  • 1/4 c. 2% organic milk
  • 1 slice of mild cheddar cheese + 2 T. finely shredded
  • salt and pepper to taste

-Preheat oven to 375 degrees. Place the bacon slices over a medium-high heat in a large nonstick skillet. Once the fat starts to melt, add the onion and green pepper. Cook until the onion is nice and brown and the bacon is cooked (about 8 minutes,), stirring frequently with a wooden spoon. With the back of the wooden spoon cut the bacon into chunks.

-Add the spinach and sautee until its tender.

-Lower the heat to low, and meanwhile whisk together the eggs and milk in a small bowl.

-Pour eggs into the skillet. Top with the slice of cheese, broken up, and salt and pepper to taste.

-Stir gently until eggs just begin to cook. Turn off the heat.

-Place the entire skillet into the preheated oven and cook for 5 minutes. Add shredded cheese and cook for another five minutes, or until eggs are completely cooked and cheese is melted. Remove from the oven and let sit 2 minutes to cool.

-Slice it up and enjoy with juice or whatever else you think belongs with second breakfast!

As always thanks for reading!!! You all helped me reach my goal yesterday of having 100 views in a day! I’m so appreciative of all of you that read and leave such nice comments! You make me a very happy girl.

4 Comments

Filed under Uncategorized

Peanut Butter & Chocolate Snack Bars

I love Chewy bars. They are such an easy snack when you don’t have time for anything else. Plus they come in so many amazing flavors (s’more flavored granola? how could that be bad?). They are pretty darn healthy but they do contain some less than desirable ingredients (despite recently changing their recipe to avoid high fructose corn syrup), and the organic versions are pretty pricey so yet again I’ve decided to take matters into my own hands. I’m trying this flavor first because, as I’ve mentioned before, Jason LOVES peanut butter and chocolate. And I obviously love it too.

Which would you prefer to eat:

Quaker Chewy Bar- rolled oats, brown sugar, rice flour, sugar, salt, malted barley extract, rolled wheat, soybean oil, dried coconut, wheat flour, sodium bicarbonate, soy lecithin, caramel color, nonfat dry milk, corn syrup, brown rice, salt, peanuts, palm oil, chocolate liquor, cocoa butter, vanilla extract, invert sugar, palm kernel, partially defatted peanut flour, lactose, dry whey, dextrose, corn syrup solids, vanillin (artificial flavor), glycerin, calcium carbonate, sorbitol, water, natural and artificial flavors, BHT (preservative), and citric acid

or

homemade bar- rolled oats, brown sugar, organic sugar, pure honey, peanuts, organic brown rice, wheat germ, unsweetened chocolate, cocoa butter, soy lecithin, vanilla, and coconut oil

Considering that this took me five minutes and less money, I like the second one. Here’s the simple recipe:

Chocolate and Peanut Butter Snack Bars (inspired by this Food Network recipe)

  • 2 1/2 c. rolled oats
  • 1 1/2 c. brown rice cereal
  • 1/4 c. toasted wheat germ
  • 1/3 c. honey
  • 1 T. organic sugar
  • 1/4 c. brown sugar
  • 1/2 c. homemade peanut butter
  • 3/4 c. semi-sweet chocolate chips
  • 1 T. coconut oil
  • 1 t. vanilla extract

-Place honey, sugars, peanut butter, and coconut oil in a small saucepan over medium heat.

-Cook until completely melted, about 5 minutes, stirring frequently.

-Remove from heat and add vanilla extract. Stir to combine and set mixture aside to cool.

-Meanwhile, stir together the rolled oats, wheat germ, rice cereal, and chocolate chips together in a large bowl.

-Pour the wet ingredients into the bowl and gently mix with a spatula to combine well. Make sure all of the dry ingredients are moistened. Empty bowl onto a greased cookie sheet.

-Using your hands or a piece of parchment paper, firmly pack down the mixture and square off the edges.

– Place the cookie sheet in the refrigerator to cool for about 30 minutes. Using a sharp knife, cut into desired shapes.

-Seperate and enjoy! Makes 14 bars. To store, individually wrap in plastic wrap and keep in the refrigerator for up to a week.

These were so tasty for a first try, the blend of grains actually gives it an amazing flavor. And I was pleasantly surprised to see that the sugar and chocolate can definitely be reduced and it would be plenty sweet enough.

Thanks for reading!

1 Comment

Filed under Uncategorized

Cheese-Stuffed Spinach Burgers with Sweet Potato Wedges

I’m a huge fan of Adam Richman, the host of “Man vs. Food” on the Travel Channel (my brother gets the credit for telling me about the show), and a couple weeks ago I saw him eat something that has not been able to leave my mind. It’s a burger called the Juicy Lucy that was invented in Minneapolis. The cheese is stuffed inside the burger instead of melted on top, so that when you bite into it a font of gloriously melted cheese comes rushing out. Genius. Behold, my version of the Juicy Lucy.

I made some changes to make it a somewhat healthy meal, the sweet potatoes as a side dish and spinach inside the burger helps to up the nutritional value a little.

(Sorry in advance for the lack of pictures, this has been a crazy week and I was making dinner in a hurry!)

The Cheese-Stuffed Burger

  • 1 lb. lean ground beef
  • 2 cups raw chopped spinach
  • 1/2 onion, minced
  • 2 cloves garlic, minced
  • 4 slices cheese (I used cheddar)
  • 2 t. salt
  • 1 t. pepper
  • olive oil
  • 1/4 c. ketchup
  • 1 T. mayonnaise

-Heat a skillet over medium-high heat and sautee the garlic and onion in a little olive oil until they are soft and lightly brown. Add chopped spinach and cook a few minutes longer. Remove from heat.

-While the spinach mixture cools, combine the beef, salt, and pepper in a large bowl using a wooden spoon. Add the spinach to the beef and mix well.

-Divide the beef into four balls. Each ball will become a burger. Split each ball into two thin patties. To assemble each burger, first lay one thin patty on the cutting board.

-Fold a cheese slice over twice to make a small square of cheese. Place it in the center of the patty.

-Take another thin patty and place it on top of the cheese. Pinch the edges of the two patties together.

-Heat a large grill pan or skillet to high heat while you assemble the burgers. Grill the burgers to desired doneness (well done takes about 10 minutes).

-Combine ketchup and mayonnaise in a small bowl to make a “special sauce” to top the burgers. Serve on toasted whole wheat buns. Makes 4 quarter pound burgers.

Sweet Potato Wedges

  • 3 sweet potatoes
  • 2 t. salt
  • 1/2 t. turmeric
  • 1/4 t. paprika
  • 1/4 t. cinnamon
  • 1/4 t. black pepper
  • 1/4 c. olive oil

-Preheat your oven to 375 degrees. Wash the sweet potatoes thoroughly and cut them into wedges.

-Add the rest of the ingredients to the sweet potatoes and toss to combine well.

-Arrange the wedges in a single layer on a cookie sheet.

-Bake in the preheated oven for 35 minutes, or until tender and golden brown. Remove from pan and drain on a paper towel over a plate.

Serve potato wedges and burger together while warm with ketchup or whatever else you like on the side!

Thanks for reading!

5 Comments

Filed under Uncategorized

Grandmother’s Buttermilk Cornbread

I’ve spent most of today writing about the different cases and statutes relating to an unconscionable automobile sales contract. Sound like fun? I don’t think I need to say more. So when Jason requested that I make some cornbread, I was glad to have a distraction. This is a recipe I’ve used for a long time (recommended by my mom, of course) and it is a perfect Southern style cornbread. It comes from allrecipes.com, and if you take a look at the number of reviews you’ll see I’m not the only one who thinks it’s perfect.

Grandmother’s Buttermilk Cornbread (from allrecipes.com)

  • 1/2 c. butter (I used half Earth Balance spread because I felt too guilty)
  • 2/3 c. white sugar (I use organic granulated)
  • 2 eggs
  • 1 c. buttermilk
  • 1/2 t. baking soda
  • 1 c. yellow cornmeal
  • 1 c. all-purpose flour
  • 1/2 t. salt

-Preheat the oven to 360 degrees. Melt the butter on the stovetop or in the microwave. Allow it to cool slightly.

-Quickly stir in sugar and then eggs. Combine buttermilk and baking soda in a separate small bowl.

-Add buttermilk mixture to the butter and stir. In a large mixing bowl combine flour, corn meal, and salt.

-Pour the wet ingredient mixture into the mixing bowl with the dry ingredients. Gently whisk together until ingredients are well combined (it’s okay if there are still some small lumps).

-Pour batter into a greased pie pan or iron skillet.

-Bake in the preheated oven for 35 minutes, or until a toothpick inserted in the center of the bread comes out clean.

-Allow the bread to cool for at least 10 minutes, slice and serve. Will stay fresh in an airtight container for 3-4 days.

Thanks a bunch for reading!


8 Comments

Filed under Uncategorized

Simply Peanut Butter

One of the few pieces of information I permanently retained from high school is something I learned in Environmental Science in the 11th grade: the fact that the FDA allows certain amounts of non-food “bits” into all of our food. One of the grosser examples happens to be my beloved peanut butter. I won’t go into too great amount of detail because it’s disgusting, but you can read it straight from the source here: FDA Approved Food Defect Levels. You can just scroll down the list of foods at the end of the document and discover all the gory details. I read an article that essentially says “Don’t worry! Eating bugs in your peanut butter is good for you!” I don’t know about you, but if I ever decide to eat a bug, I would like to actually know about it when I’m doing so. I don’t want bugs. I just want peanut butter. So I’ve taken matters into my own hands.

This has led me on a quest to make the perfect nut butter, a quest that was much shorter and easier than I ever expected. Nuts naturally release oil when they are processed, and so nut butter literally makes itself. So awesome.

When I went to the local farmer’s market this weekend, there were lots of peanut farmers there. I decided to buy a bag of unshelled peanuts for the purpose of making this butter. I prefer unshelled because 1. you can weed out the “bad” peanuts yourself 2. you can keep some of the skins, which add a great flavor to the butter. Plus, they’re local! Which is always a good thing.

Besides, shelling nuts is kind of therapeutic.

No bugs here.

Here’s the ridiculously easy recipe that I have come to after a few experiments.

Simply Peanut Butter:

  • 1 1/2 cups shelled peanuts
  • 1 t. sugar
  • 1/2 t. salt (if the nuts are unsalted)

-Place ingredients in a food processor, and let ‘er rip!

It will start like this:

Then look like this:

And end up like this:

It’s a little closer to nature, and it tastes delicious.

Thanks for reading!

6 Comments

Filed under Uncategorized